

Today I’m going to show you exactly how to trade pin bars for consistent profits.
I’m also going to share my favorite entry methods and a combination pattern with a ridiculously high win rate.
The pin bar was the only pattern I used when I started trading over a decade ago, and I still trade them today because they work.
So if you want to massively boost your trading profits this year, you’ll love today’s blog post.
Let’s get to it!
What is a Pin Bar?
Before getting into the actual Forex pin bar trading strategy, we need to understand the characteristics.
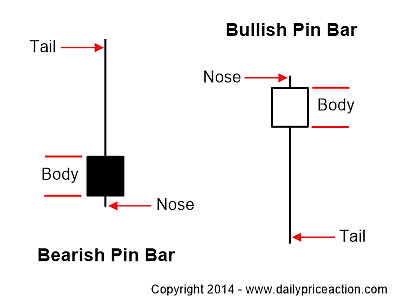
Let’s start with the tail, which is its defining characteristic and is also sometimes called the wick or shadow.
The tail of a pin bar should be at least 2/3 the length of the entire bar.
The longer, the better, but it must make up at least 2/3 of the bar from end to end.
Notice in the image above, the tail is about 3/4 of the entire bar, so this qualifies.
The body is also important as it represents the open and close of the pattern.
The open and close should be close together; the closer, the better.
The body should also be close to the end of the pin bar. Notice how close the open and close are to the nose.
Last but not least, the nose.
While not as important as the tail or body, the nose is important only as it relates to the tail and body.
This is because if the tail is at least 2/3 of the entire bar and the body is small, then the nose should also be relatively small.
Know too that the pattern doesn’t need a nose to be valid.
Sometimes it’s non-existent if the open or close occurs at the extreme end of the pin bar.
Here’s a short video explanation of the characteristics.
http://dailypriceaction.wistia.com/medias/ow468udvnd?embedType=async&videoFoam=true&videoWidth=640
The Two Types of Pin Bars
There are two main types of pin bars as it relates to price action patterns that are taught in my price action course.
Most traders assume the pin bar is only a reversal pattern. And while it can signal a reversal, it can also be a continuation pattern.
First, let’s look at the more common way to trade pin bars as a reversal pattern.
Pin bar reversal pattern

The reversal pin bar (above) is best played in a ranging market or on a pullback within a larger trend. Let’s look at both in action.
Below is a great example of a reversal that formed after price broke through support and then retested it from the other side as resistance.
This is actually a pattern that’s still taking shape as I type this.

Here are two more examples that occurred at range highs.

So far we’ve seen pin bars that form on pullbacks as part of a larger trend as well as ones that form in ranging markets.
Now let’s look at the less common way to trade them as a continuation pattern.
Pin bar continuation pattern
The differentiating factor here is that the continuation pattern doesn’t have a pullback (or very little) relative to the examples above.

The key to this pattern is that the pin bar must form in the direction of a trending market.
Notice the pin bar just in front of the one I’ve identified in the chart above, the one that’s facing the other direction.
It’s also a valid pattern.
However, it’s going against the trend, so it would not make for a good trade.
Here’s a zoomed-out chart of the same setup to see what I mean…

I wanted to put this chart up for three reasons.
- To show that our pin bar would have given us a nice gain because it’s well-formed and in the direction of a strong trend
- The first pattern that formed in the chart above was against the trend, so it would have been a “no trade” for us
- The reversal pin bar I pointed out in the chart above is technically perfect. However, it would have been a “no trade” for us. If you said because it’s against the trend, you’d be right! But there’s another reason why we wouldn’t have traded that reversal and it’s described in the next section.
Pin Bars and Confluence
Confluence is the coming together of two or more “things”.
For Forex traders, confluence means the coming together of, or combination of, two or more price action patterns, levels, or indicators.
Let’s look at the setup below, which is the exact same setup we looked at before, only this time we’ll start identifying our “factors” of confluence.

Let me clarify what’s happening here by identifying the various factors at work.
To make this as applicable as possible, I’ll go through each factor as if I were doing my own analysis.
- Well-formed pattern rejecting previous resistance level, now acting as support
- The trend is clearly up
- The pin bar is rejecting the 8-day EMA, which is intersecting the horizontal support level
- No immediate resistance above the pin bar (it has room to run)
So there you have it, a simple pre-trade analysis using confluence factors. It’s really that simple.
I should point out that #4 above isn’t technically considered a confluence factor, but clearly identifying support and resistance levels is an extremely important part of any pre-trade analysis.
You’re probably wondering what the two moving averages are all about.
Well, I use the 10 and 20-period EMAs in my trading. I find that they help to quickly identify the trend and also act as dynamic support and resistance.
As a side note, you might find that I don’t use them on all the charts posted on this site, but that’s only because I don’t want to unnecessarily clutter the price action patterns.
You are probably on to it by now, but I want to point out why that reversal pin at the top of the GBPCAD chart above doesn’t fit our criteria. So here it is…
In other words, we didn’t have the necessary confluence to consider this a worthy pin bar to trade.
It has everything going against it except that it is a well-formed pin bar.
The two most important reasons why I wouldn’t trade the reversal pattern above are:
- It’s against the major trend
- There’s no resistance level to give me a reason to believe that it is indeed a reversal point in the market
That about wraps up confluence. Think of these confluence factors as your pre-trade checklist, similar to a pilot’s pre-flight checklist, only ours is a LOT shorter…at least I hope.
Pin Bar Entry and Exit Methods
Now that you have a firm understanding of the pin bar candlestick pattern and how to identify them, let’s discuss entry and exit strategies.
But before we do, I want to touch on the concept of a favorable risk to reward ratio.
You see, every trade setup you take, whether it be in the forex market, crypto, or any other should have a favorable risk to reward.
That means the reward should heavily outweigh the risk.
My minimum to take a trade is a 1:3 risk to reward, meaning the potential reward from the setup is three times larger than the risk.
So if I’m risking $1,000, my minimum reward as defined by my profit target must be $3,000 or better.
However, although 1:3 is my minimum, I aim for 1:5 setups or better.
In trading, we express this as 3R or 5R, where “R” is the risk and the “3” or “5” represent the reward as a multiple.
Alright, with that covered, let’s get into our entry methods.
Entry Method #1 – Break of the Pin Bar “Nose”
The break of pin bar nose entry is the more common and conservative way to enter a pin bar trade.

Entering on a break of the pin bar nose involves placing a stop order just beyond the nose of the pin bar.
In the example above, we would place a sell stop just below the pin bar nose.
The distance at which you place the order is really personal preference and depends on the currency pair traded, but a good rule of thumb is 10-20 pips.
This allows for some room in case of a false break.
Entry Method #1 – 50% Retrace Entry
This is my favorite way to enter a pin bar trade.
It’s my favorite because it allows for a much better entry, thus increasing the potential R-multiple considerably.
This means that on a potential 2R trade using the break of pin bar nose method, you can now get a potential 3R or better using the 50% entry method on the exact same trade setup.
If used properly, the 50% of pin bar entry can have a drastic effect on your account balance over time.
To get our pin bar entry level using the 50% rule, we simply drag the Fibonacci Retracement tool from the top of the pin bar tail to the bottom of the pin bar nose.
Of course if this were a bullish pin bar we would drag the Fibonacci Retracement from the bottom of the tail to the top of the nose.
Over time you’ll become so comfortable with this pin bar entry strategy, that you won’t need to use the Fibonacci Retracement.
Until then it’s good practice to draw it out as it will help keep you disciplined.
Although the 50% entry can provide better returns, it’s not without flaw.
About half the time (even less on some currency pairs) the market won’t retrace 50% of the pin bar, leaving your buy or sell limit order unfilled.
This means that if you find an exceptional pin bar setup and decide to use the 50% pin bar strategy, there’s a chance your order may not get filled and you’ll be left behind.
There’s nothing worse than waking up in the morning to see the market has run 200 pips in the desired direction but missed your limit order by 5 pips.
But it’s a chance that many, including myself, are willing to take in order to squeeze out a higher R-multiple.
Where to Set a Pin Bar Stop Loss Order
So how do we plan for a potential loss on a pin bar setup? By always making sure we have a stop loss order in place.
The best place to set your stop loss on a pin bar trade is above or below the pin bar tail.
This is true regardless of the entry strategy you utilize.
For a bullish pin bar setup we would place the stop loss just below the pin bar tail.
The distance at which you place the stop loss depends on your comfort level as well as the currency pair being traded, but a good rule of thumb is 10-20 pips from the end of the pin bar tail.
How to Set a Pin Bar Take Profit Order
Now for the really fun part, setting the take profit order for our pin bar trade.
This can be a little harder to explain, but I’m going to try and make it as straight forward as possible.
The first thing you want to do is to identify the support and resistance levels on the chart.
In reality this would be the very first step, even before identifying a potential pin bar setup.
This is because in order to know if a pin bar setup is valid you would need to know if it has confluence, and would have already drawn your levels on the chart.
While this is true, I always look for additional levels on a chart once I’ve spotted a potential pin bar setup.
I do this to make sure I didn’t miss any key levels that may effect the validity of the pin bar setup.
Using the same pin bar setup as before, the first level of support looks like it would come in around the .8987 level, so this would be a safe place to take profit.
In hindsight the market did drop further, but it’s always a good idea to set your take profit at the first area or support or resistance.
Once you get really good at the pin bar strategy, it’s possible to let some trades run further by watching how price reacts to a level, but for now just focus on taking profits at the first level.
Now that we understand how to enter a pin bar setup and how to exit one, I have a test for you.
What if we used the break of pin bar nose entry for the pin bar setup above – is there anything wrong with that?
I’ll give you some time to analyze it…
Okay, I’ll give you a hint, it begins with “R” and ends with “multiple”, oh and there’s a “-” in between. 😉
If you knew that, great job!
Because our first level of support (profit target) is so close to the pin bar setup, an entry on the break of the pin bar nose would violate our 2R minimum we set previously.
What to do?…if you said use the 50% entry method, you are spot on, good job!
Here’s what the two strategies would look like in action…
Hopefully the illustration above doesn’t look like something out of John Madden’s playbook.
But in case it does, let me break it down.
Using the break of pin bar nose entry strategy, we get a stop loss of 80 pips and a potential profit of 90 pips.
As mentioned previously, this violates our 2R minimum as our profit target would need to be at least 160 pips away, so there’s no trade using this type of entry.
Using the 50% entry strategy, we end up with a 40 pip stop loss and a potential profit of 130 pips!
See the power of the 50% pin bar strategy?
As an R-multiple, the break of pin bar nose entry becomes a 1.1R, while using the 50% entry becomes a 3.25R.
If risking $100, that’s about a $110 profit using the break of pin bar nose entry strategy and approximately a $325 profit risking the same $100.
That’s why I prefer the 50% pin bar entry; it’s powerful!
How to Trade the Inside Bar Pin Bar Combination
Before we wrap things up, I want to show you one of the most profitable candlestick (combo) patterns around.
In case you don’t know, I’m a big fan of pin bars and inside bars.
But the real magic happens when these patterns form together.
I’ll explain why below, but first let’s take a look at both halves.
Two Halves Explained
As you might have guessed, the first part of the inside bar pin bar pattern is the inside bar.
An inside bar (or candlestick) is one that forms entirely within the previous bars range.
Here’s how that looks:

Notice how the previous candle (mother bar) engulfs the following candle (inside bar).
That’s really all there is to an inside bar, and it doesn’t need to be more complicated than that.
You already know what a pin bar is from the above sections, but here’s a quick refresher:
Remember that the nose should be relatively small and the tail should be about two thirds of the candlestick’s range.
Also note that the best pin bar patterns form with the underlying trend.
The Best of Both Worlds
Inside bars are commonly traded as continuation patterns.
However, there’s a caveat.
If an inside bar occurs at key support or resistance, it can signal a reversal.
And what’s better than one reversal signal?
Two reversal signals, of course.
That brings us to the inside bar pin bar combination.

Notice how the inside bar formed first, and occurred at key support, and was immediately followed by a bullish pin bar.
It’s as simple as that.
The best part is that this combo pattern has an even higher win rate than either signal on its own, and that’s saying something!
Oh, and you can use the same entry and exit methods I explained above for this setup.
The 3 Ingredients of a Valid Inside Bar Pin Bar Setup
Like any of the strategies we trade here at Daily Price Action, there are certain characteristics that determine whether or not a setup is valid. The inside bar pin bar combination is no exception.
Below are three things that must be present in order for this pattern to be considered tradable. These are in addition to the actual inside bar and pin bar, which are of course mandatory.
1) Time Frame
First and foremost, the pattern must form on the daily time frame.
This is because the inside bar, which makes up half the pattern, is only valid on this time frame.
Anything lower than the daily time frame is likely to result in a false break and should therefore not be traded.
2) Key Level
The next and perhaps the most influential characteristic is the key level.
The entire premise of this pattern relies on a key level of support or resistance. It’s what gives validity to the pattern.
I strongly advise only taking setups where there is a key horizontal level or trend line acting as an inflection point in the market.
This will also help you to decide if a setup has become unfavorable.
3) Pay Attention to the Closing Price
This next one is a bit different from how we trade a typical pin bar setup.
The difference here is that the close of the pin bar must be contained by the range of the inside bar.
The only exception here is if you get a “strong” close whereby the pin bar engulfs the inside bar in a way that is favorable for the setup.
The image below explains this in more detail.

The image above shows two valid setups and one invalid setup.
Notice how the first image shows a pin bar where the open and close are contained within the range of the inside bar.
This represents a valid setup and is also the most common among the three.
The second image shows a pin bar that closed above the inside bar’s high.
This is still a valid pattern because of the strong close by the bulls. So strong in fact that it formed a bullish engulfing pattern as a result.
Last but not least is the invalid pattern.
Notice how the pin bar failed to close within the range of the inside bar.
This is considered a weak close as it signals that the bulls are not in full support of a move higher.
It’s generally best to ignore patterns like this.
Pro Tip: The easiest way to avoid unfavorable inside bar pin bar combinations is to only trade the obvious setups. If you have to study the market for an extended period of time to determine if a setup is favorable or not, it probably isn’t worth taking.
Entry Strategy and Stop Loss Placement
The entry and stop loss placement for the inside bar pin bar combination are very similar to that of the pin bar strategy. In fact, they are exactly the same.
Entry Methods
Option #1: Use the 50% entry strategy whereby you enter on a 50% retrace of the pin bar.
This is my preferred method as it provides me with a much more favorable risk to reward ratio.
Option #2: The second and less favorable option is to enter on a break of the nose of the pin bar. Entering this way gives you a less favorable risk to reward ratio.
Stop Loss Placement
As with the traditional pin bar strategy, the stop loss should be placed above or below the tail of the pin bar.
If the market reaches this area, the pattern is compromised and the setup is no longer valid.
See The Definitive Guide to Choosing a Stop Loss Strategy for more information on the topic.
The Inside Bar Pin Bar Strategy in Action
We’re going to finish off the lesson by looking at two inside bar pin bar combinations that occurred in the market.
Both of these setups were highlighted as they formed inside of the Daily Price Action private community.
The first setup formed on AUDNZD during a downtrend after the pair broke a key support level that had been in place for eight months.

Notice how after breaking trend line support, AUDNZD formed a bearish inside bar.
The pair then retested former support as new resistance the following day and carved out a well-defined bearish pin bar in the process.
By using the 50% entry strategy we were able to secure an entry with a 45 pip stop loss.
The trade is currently 160 pips in profit and still going.
That represents a 3.5R trade, or 7% profit if risking just 2%.
Next up is an inside bar pin bar setup that formed on USDCAD within a ranging market.
This illustrates the power of this strategy in that it can be successfully traded in both trending and range-bound markets.

Prior to forming this range, USDCAD had been in a strong rally for more than eight months, creating a broader bullish sentiment.
The setup we traded formed after trend line support had held on four separate occasions.
By using the 50% entry strategy we were able to enter long with a 70 pip stop loss.
The profit target was easily identified at recent highs, which resulted in a 300 pip profit.
That represents a 4R trade, or 8% profit if risking 2%.
Not bad for three days of not working.
Summarizing the Inside Bar Pin Bar Strategy
The inside bar pin bar combo can be a great addition to your trading arsenal.
It’s very similar to the traditional pin bar strategy, only it comes with a second dimension that makes it even more reliable.
One thing to keep in mind as you begin trading this combination is that they don’t occur nearly as often as the traditional pin bar setup.
However, when they do occur at a key level with a favorable risk to reward ratio, they are certainly worth considering.
Below you will find some of the key points to keep in mind as you begin to trade this pattern on your own.
- The pattern is created when a pin bar forms immediately following an inside bar on the daily time frame
- The three ingredients for a valid pattern are the time frame, key level and the close of the pin bar
- Any pattern that forms on a time frame lower than the daily should be avoided
- A key horizontal level or trend line gives credence to the pattern and is therefore required
- The pin bar must close within the inside bar’s range or show a “strong” close in the direction of the setup
- Only trade the obvious setups where the tail of the pin bar is pronounced
- The 50% entry is the most favorable way to enter the market
Frequently Asked Questions
What is a pin bar?
A pin bar is a type of candlestick pattern that suggests strong buying or selling pressure because of the long upper or lower wick, also called a shadow or tail.
What characteristics define a pin bar?
It must have a wick that is at least two-thirds of the candlestick’s range. So the body of the candlestick must be relatively small compared to the overall size of the pattern.
What makes pin bars effective?
The most effective pin bars occur at key support or resistance levels and occur either with the underlying trend or within an established range.
Are all pin bars reversal patterns?
Not necessarily. While most pin bars signal a reversal, they can also occur within a trend. So they can be continuation patterns under the right circumstances.
Is pin bar a good trading strategy?
It is, but only when combined with other factors, including the quality of the pin bar itself and whether it formed at a key level, among others.
Your Turn
Are you currently trading pin bars?
If not, will you in the future after reading this article?
Let me know right now in the comments below.
