
Is it oversimplified to say that in order to become a consistently profitable Forex trader you need to only trade the best setups? Probably – I think we can all agree that this is considered common knowledge.
But what isn’t so common is what makes a pin bar setup the “best”? Furthermore, how do we identify these setups in a market that’s constantly changing?
That’s exactly what we’re going to discuss in this lesson – how to only trade the very best pin bar setups.
What Makes a Favorable Pin Bar Setup?
The key to becoming a profitable Forex trader is to put the odds in your favor. Even a best guess on which way the market might go has a 50% chance of being the correct one. After all, we only have two options as Forex traders – buy or sell.
So what happens when we take those odds and start attaching other factors that have a probable outcome? Naturally, our odds of success begin to increase. We call these confluence factors, and they are what help to put the odds in our favor.
These factors can be things such as trading with the trend, using price action signals and always maintaining a proper risk to reward ratio.
Before we get started, I should make it clear that although the topics listed below will help to put the odds in your favor, there is no such thing as a sure thing in Forex. So regardless of how good a setup looks, always be sure to remain disciplined and use an appropriate stop loss strategy.
That said, let’s dig in!
Creating a System of Checks and Balances
In order to benefit from these confluence factors, you have to operate under a system of checks and balances. This will help keep you accountable for the trades you take and will also help you to avoid taking subpar trade setups.
By using a simple checklist, you will be able to quickly and easily identify the best setups. Let’s take a look at some key factors that you should include on your checklist.
1. Is the Trade Setup With the Trend?
By now I’m sure you have heard the saying, “the trend is your friend”. While this may be one of the oldest sayings out there, it’s also one of the most accurate.
However, despite the popularity of this saying, there are still those out there who disagree. They think that trying to catch an existing trend is harder than predicting a future trend. In my experience, this couldn’t be further from the truth.
Think of a trend as momentum, or a market’s order flow. The strongest trends that continue for weeks, months or even years are those that are backed by banks and hedge funds. I don’t know about you, but I would much rather trade with these guys than to try to trade against them.
Here’s a great example of a strong trend that is being backed by “smart” money.

The chart above is an example of when you only want to look for bullish price action signals. This uptrend is a strong indication that smart money is buying, and so should you.
Just remember that when in doubt, trade in the direction of least resistance.
2. Is the Trade Setup at Key Support or Resistance?
How is it that some traders can feel that the trend isn’t your friend? Simply put, they don’t have a way of identifying key “event areas” within an existing trend.
This leads to blindly buying or selling within an uptrend or downtrend respectively. This is the quickest way to blow a trading account. A far better approach is to use what are known as event areas to identify possible support or resistance within a trending market.
Let’s take a look at a key event area within the same GBPUSD uptrend.

Notice how we are still using the bullish momentum in our favor, but instead of blindly entering a long position, we’re using a key event area to look for bullish price action. This area was created by former resistance, which became support once the market broke through it.
These event areas can be found in any uptrend or downtrend and offer a great, low-risk way to trade with the momentum.
3. Is a Valid Price Action Signal Present?
This is a key component to any price action trader’s confluence checklist. Using event areas within a strong trend is a great start, but in order to gauge whether a level is likely to hold you need to see a valid pin bar signal.
Why do I say a “valid” pin bar signal? Because it isn’t good enough to just see a price action signal at a key level – it must confirm that the level is likely to hold and form in the direction of the prevailing trend.
Here is a great example of how to use a pin bar as a confirming signal within an uptrend.
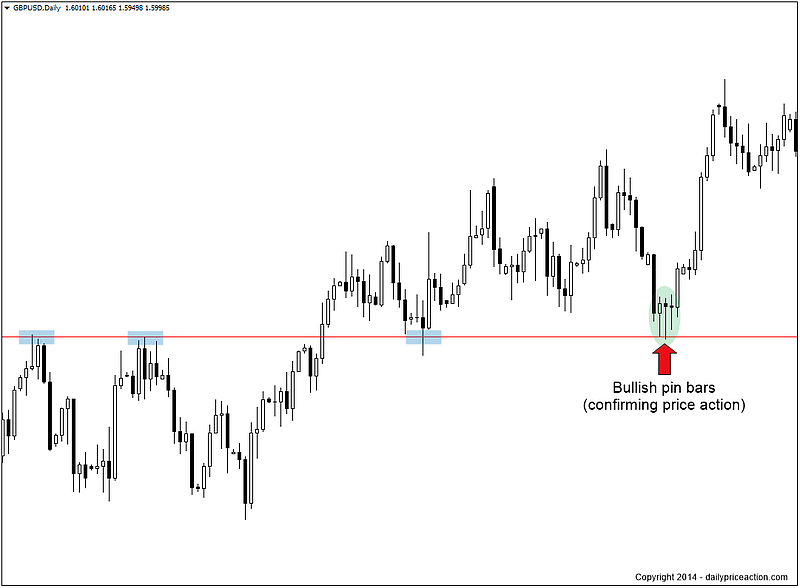
Notice how both of these bullish pin bars are well-formed and respect the key support level. The actual trade setup would have come on the first pin bar, with the second pin bar further supporting the idea that the level is likely to hold.
Note: Although the second pin bar tail extends beyond the first, it only does so by 4 pips. This is why I always advocate using a buffer of about 10 pips between your stop loss and the tail of a pin bar.
4. Does the Trade Setup Allow for a Proper Risk to Reward Ratio?
Using a proper risk to reward ratio is an essential component of successful Forex traders. What is a proper risk to reward ratio? Simply put, a proper risk to reward ratio means never risking more than half of the potential reward.
Using the GBPUSD example, we had a trade setup with a 60 pip stop if using a 50% entry. Therefore our target needs to be at least 120 pips (60 x 2) from the entry. As you can see in the chart below, the next logical resistance area was the recent high, which gave us a more than favorable risk to reward ratio.

In the setup above, we had a stop loss of 60 pips. If we measure from the entry point to the profit target, we can see that the distance is 350 pips. This is far more than the required 120 pips to qualify as a proper risk to reward ratio. We can, therefore, put a check next to this box as it certainly meets the requirements.
In fact, this setup represented a 5.8R trade. This means that if you had risked $100, you would have made $580 ($100 x 5.8). That’s the power of using a proper risk to reward ratio.
Summary
It’s essential that you use a checklist when trading pin bar setups. It will help you stay disciplined when evaluating which setups are worth your hard-earned money.
You will eventually reach a point where you can perform a mental evaluation of each setup, however until that time I recommend that you keep a written checklist much like the one we just discussed.
Let’s recap some of the key points from the lesson.
- The best pin bar setups are the ones that have all 4 confluence factors
- Only look for setups that are with the trend – path of least resistance
- The setup must form at a key event area within the existing trend
- The pin bar must be well-formed and be in the direction of the prevailing trend
- The setup must allow for a proper risk to reward ratio of at least 1:2 (risk:reward)
Your Turn
Did you find this checklist helpful? What other criteria do you use when searching for pin bar setups?
Leave your comment or question below.